This website contains post on DIY information and latest gadgets! , Updating your Android ROM and if you need to know anything else other than these, please leave your request!
Total Pageviews
Wednesday, November 10, 2010
Making a USB Bootable Disc
A FEW THINGS YOU NEED TO CONSIDER IN ADVANCE
1. The PC has to support booting from a USB flash/pen/key drive. There
may be anywhere from 1-3 items to change in the BIOS to make this
possible assuming your BIOS supports it. Some bios's may refer to your
flash drive as a USB floppy or USB zip. Of course there are
exceptions, perhaps some are covered here.
2. The USB flash drive must support booting from it in general.
3. The flash drive must contain the boot/system files.
4. The flash drive must have bootsector area. This is done with
special utilities.
5. References to "A:" drive lines in the autoexec.bat and/or
config.sys files you copy to the drive after you make it bootable may
result in errors.
6. You "may" have to format your floppy disk first in WinXP before you
create a bootdisk as XP may "not" like working later on with a disk
formatted otherwise.
7. Included below is a bootable ISO of DOS 7.1 which may be used with
some of these methods if you do not have a 1.44 drive.
METHODS
Method 1
- Make your flash drive bootable using Bart's mkbt util:
http://www.nu2.nu/mkbt/
Put a bootable floppy disk in your A: drive or create one using
Windows.
Download mkbt20.zip and unpack to to new temp folder you create.
Go to the temp folder.
Extract the bootsector from the bootable floppy disk. eg Open a DOS
Window and go to the directory where you extracted MKBT. Type:
mkbt -c a: bootsect.bin
The boot sectors from the bootable floppy disk have just been saved to
a file in the temp folder you created.
Format the flash drive in FAT or FAT16.
Copy the bootsector to the flash drive. Open a DOS Window and go to
the folder where you extracted MKBT. Type:
mkbt -x bootsect.bin Z:
"Z" represents the flash drive drive Letter. So if your flash drive
has another drive letter, then change the "Z" accordingly.
Now you can [grin] "should" be able to copy the utils you need to the
pen drive.
Try these 2 USB Flash Drive Utilities by HP/Compaq. They
work with Most other brands of flash drives as well.
hpflash2.zip HP USB Disk Storage Format Tool. Formerly called
hpflash1.zip
HP Drive Key Boot Utility Version 7.41
Download
"I would put a little extra in there." Says a fan who emailed me with
no name:)
For the downloads section I use nLite to make and create the image
file as you can import the service packs and do some tweaking to the
install files.
http://www.nliteos.com/download.html
1. Install the HP USB Disk Storage Format Tool and run the program.
2. Select the Device and the File system from the drop down menus and
click start.
3. Close the above program and install and run the HP Drive Key Boot
Utility. Selecting the appropriate drive letter. Click Next.
4.Select the circle on the top that says create New or Replace
Existing Configuration. Click Next.
5. Select the circle labeled Hard Drive. Click Next.
6. Select Create New Filesystem. Click Next.
7. Select the circle labeled HP Firmware Flash Package. Click Next.
Click Finish
Tuesday, November 9, 2010
Setup Linksys Wireless router in PPPOE
Configure Linksys Router in PPPOE mode
Here in the below instructions we have used linksys WRT54G router, but the steps remain the same for all linksys routers.Step 1: Make sure that you can go online by connecting your computer to the modem (Without connecting WRT54G router in the network).
Step 2: Connect your computer to the one of the LAN port of WRT54G.
Step 3: Connect the modem to the WAN Port of WRT54G and all devices should be powered on.
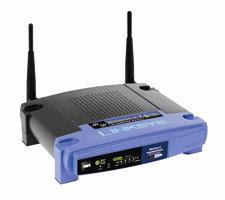 Linksys Wireless G Router
 Step 4: Open Internet Explorer and type the default IP Address of the Router. The default IP address of WRT54G is 192.168.1.1 and press enter.
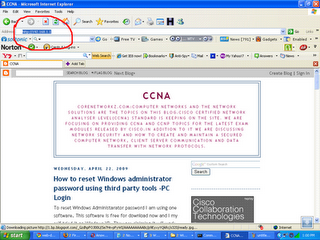
Step 5: After Entering the default user name and Password you will log on to the Router Setup page.
Default user name : {mo user name}
Default Password : admin
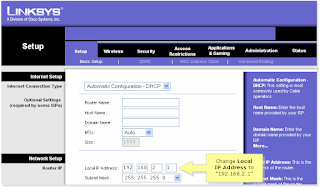
Update: To configure in PPPOE there is no need to change the current Local IP Address.
Step 6: On setup page select PPPOE instead of "Automatic Configuration DHCP"
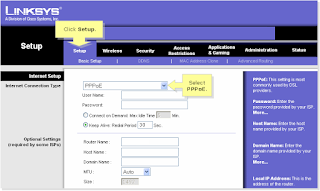
Step 7: Enter the user name and Password provided by your Internet Service Provider and click on save.
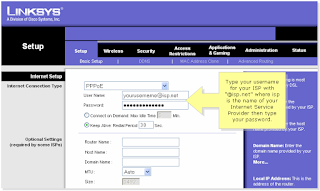
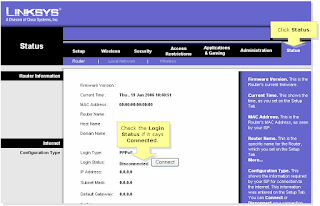
Step 8: Click on status bar and click on connect button.
Configure the Belkin router
In this tutorial I am explaining the steps to configure Belkin Wireless N router F5D8233-4 by accessing the web based setup page.
Steps to configure Belkin Wireless N router:
Before accessing the web based setup page connect your router to the computer as shown in the figure. Here Ethernet port of the computer is connected to the LAN port of Belkin router using an Ethernet cable.
Now unplug the power cable from the modem. Let the Belking router and the computer powered on. Steps to setup Belking Router by accessing the steup page are:
1. Access Belkin setup page
To access Belkin's web based setup page type 192.168.2.1 on the address bar of the browser.
The default IP address of Belkin Wireless N router F5D8233-4 is 192.168.2.1
2. Enter the password while it prompts
By default there is no password set for the router and you just simply click submit button to log on to router setup page.
3. Setup the connection type ( Internet WAN)
Click on Internet WAN and select the connection type you want.
If you select the Dynamic IP option the window will be like this.
If you select PPPoE configuration from Belkin connection type the page will look like:
Here you should enter the user name and password provided by your Internet Service Provider. After entering the details you should click on save settings. Now your Belkin router is configured in PPPoE. In the same way your can setup your Belkin router for static IP and PPTP.
4. Change the LAN settings in Belkin Router
You can change the router IP address and you can enable or disable the DHCP function on the Belkin router using this window. By default belkin router IP address is 192.168.2.1 but you can change it to any other valid IP address.
5. Setup Wireless feature in Belkin Router
To edit the wireless settings click on Wireless tab in the setup page. You can edit the Wireless network name and wireless channel here.
Wireless name (SSID) is the name of your wireless network. The most recommended wireless channel is 6. You can use wireless channel 1 and 11 too.
6. Enable Wireless Security in Belkin
To enable wireless security on Belkin router click on security under wireless tab and follow the instructions in the link below.
How to check the router IP address
Till now I have completed many router configuration tutorials. In every tutorial I am writing steps to log on to the router before start configuring it. Here what I am planning is to write a complete guide for steps to login to any router irrespective of manufacturers and providers. Hope this will be useful for my readers. First step we need to find out before start configuring our router/ modem is to find the IP address of that device. It is because in order to log in to the router/Modem we need to know the IP address of the device. Even if you don't have your router manual where the login IP is present, you can simply follow the steps below to find your router login IP address.
Steps to discover Log-in IP address of your Router
To find the login IP address of your router:
1. Connect Router/ Modem to the computer and power on the device
2. On command prompt Type ipconfig
Follow the below steps to open command prompt:
1. start >> run >> type cmd or command and hit the ENTER key to open command prompt.
Check the default gateway address shown in your command prompt. It is the configured IP address of your router which is connected to your computer. If you need to log in to this router, you can simply type the IP address shown in the command prompt(Default Gateway) on the address bar of your web browser and press enter. Now it will ask you the user name and password to enter. In default settings it will be the configuration of admin.
Scenario :1
User Name : admin
Password : admin
Scenario :2
User Name :
Password : admin
Scenario :3
User Name : admin
Password :
How to configure wireless router with DSL connection
1. Cable broadband
2. DSL broadband
Configuring Router with Cable broadband is easy compared to setup Router with a DSL modem. In this tutorial we can see the steps to configure a wireless Router with a DSL broadband connection.
Step 1: Make sure you can go online with your modem
The first step is to make sure whether you can go online directly from modem or not. In this step you need to connect your computer to the modem and try to access Internet. If you are able to go online, you can continue to second step.
Step 2: Find the IP address of the DSL modem
To check the IP address of the modem which is connected to the computer follow the steps below.
Go to command prompt and type ipconfig ,press enter. The default gateway listed there is the IP address of the DSL modem. In this tutorial I assume the IP address of your DSL modem is 192.168.1.1
To know more about finding the login IP address of a modem click on the link below.
How to find Login IP of a Modem or Router
Step 3: Configure Wireless Router
To configure Wireless Router follow the steps below.
1. To configure the wireless router disconnect modem from the computer and connect router to the computer.
2. Power on router and log in to the Wireless router using its default IP address. You can find the default IP address of the wireless router from the user manual or by the method we used to find the IP address of the modem.
Say it is 192.168.1.1
3. Log in to the router by typing the IP address 192.168.1.1 and press enter. Enter default user name and password when it prompt. Normally it would be admin or refer the router user manual.
4. On the setup page change the router IP address to 192.168.2.1 and save settings.
Note: The reason for changing the IP address of the router from 192.168.1.1 to 192.168.2.1 is router and modem IP should be in different subnetworks.
Step 4: Connect modem to the network
To connect modem to the network follow the steps below.
1. Connect modem to the WAN port of the router
2. Connect computers to the LAN port of the router
3. Power on modem and after 30 seconds power on router.
Now the network will work fine.
Note: In some DSL modem the IP address may not be 192.168.1.1 , It may be 192.168.X.1 where
X = any number between 0 to 254 other than 1. In this case we can directly connect modem to the router as the network will work fine.